Start with the surface category
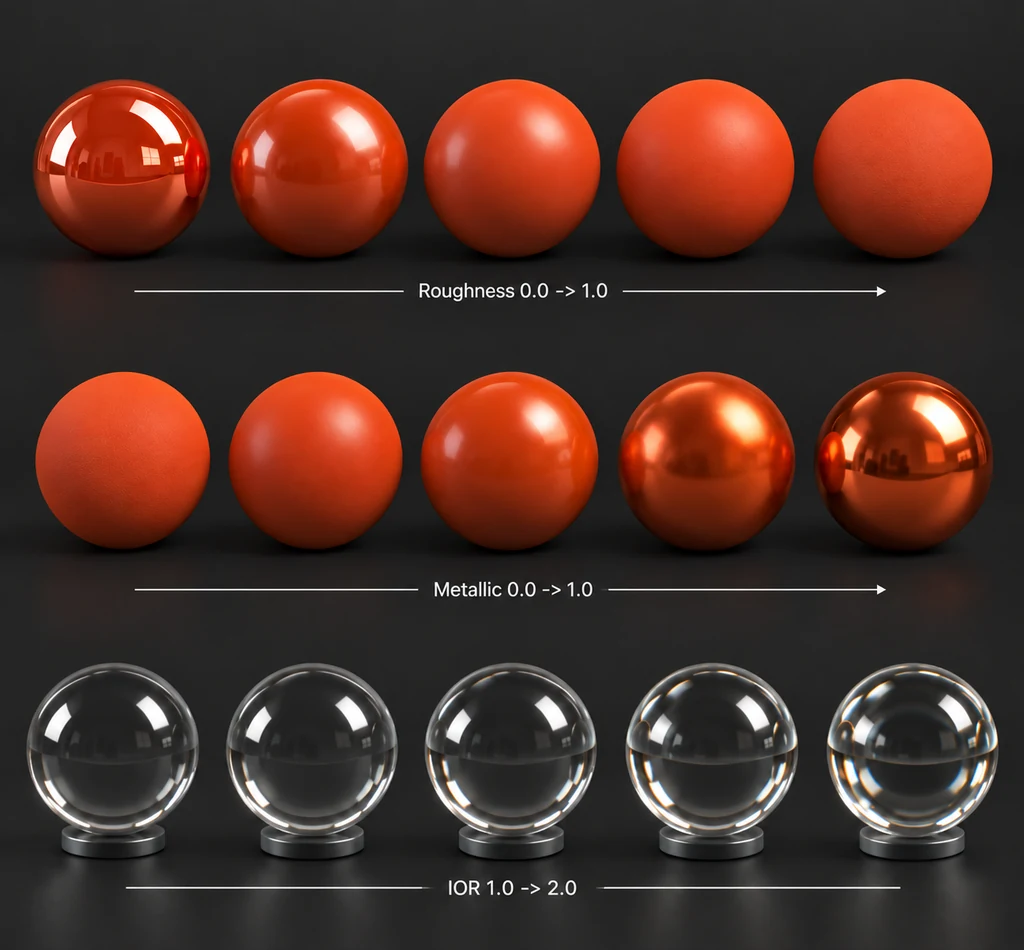
The Principled BSDF is Blender's physically based surface shader. It groups common material controls into a single node and follows an OpenPBR-style model. Blender Manual: Principled BSDF
Before moving any slider, decide whether the visible surface is mainly a dielectric or a metal. Plastic, painted wood, ceramic, glass, rubber, fabric, and most coatings are dielectrics. Aluminum, brass, stainless steel, and gold are metals. A painted metal product usually has a dielectric paint layer over a metal substrate. The viewer sees the coating first, so start it as a dielectric material and add a coat only when the reference requires it.
This first decision matters because Base Color, Metallic, Roughness, and IOR do not operate as separate decoration controls. Together they describe how the surface reflects and, where relevant, transmits light.
Set Base Color from an appropriate surface reference
Base Color defines the surface color before lighting and view angle change its appearance. For a plastic appliance, use the paint or molded-plastic color. For a metal, use the metal's reflection tint. Do not paint baked shadows, bright highlights, or ambient occlusion into Base Color. Those details belong in lighting, roughness, normal, or occlusion data.
Use a color-managed reference. A studio photograph can contain white-balance shifts, strong environment reflections, and tone mapping. Sample from a flat, well-lit region when possible. Then render the asset under a neutral environment and compare the result with the reference. If a material matches only under one HDRI, the Base Color may include lighting that the shader should create instead.
For a Base Color texture, set the Image Texture node to sRGB. Blender's manual identifies Base Color as a color input.
Use Metallic as a material-class switch
Metallic controls the blend between dielectric and metallic behavior. In a basic product material, use a value near 0 for dielectrics and near 1 for exposed metal. Intermediate values can represent a filtered or mixed material region, such as a boundary between exposed metal and paint. Keep the interpretation tied to the surface and texture filtering rather than using metalness as an arbitrary reflection-strength control.
Avoid using a mid-grey Metallic value to make an object look more premium. That creates an ambiguous surface model. If a product needs stronger reflections, inspect Roughness, the environment, and the surface normal first.
For a Metallic map, set the Image Texture node to Non-Color. Metallic values are numeric data, not display color. Treating a data map as sRGB changes the values before the shader uses them.
Shape reflections with Roughness
Roughness describes the spread of reflected light. Lower roughness produces tighter reflections. Higher roughness produces broader reflections. It does not add dirt by itself, and it is not a simple blur control. Use the reference to identify the visible micro-surface condition: polished anodized metal, powder-coated paint, brushed plastic, satin ceramic, and rubber all need different roughness behavior.
Start with a uniform value that matches the broad reflection width. Add a map only when the real object has visible variation, such as brushed directionality, molded grain, wear, fingerprints, or a clear transition between materials. Keep that variation subtle unless the reference clearly shows it. Strong random roughness often makes a manufactured product look damaged.
Roughness textures are data textures. Set their Image Texture nodes to Non-Color. If you pack ambient occlusion, roughness, and metallic values into RGB channels for a downstream glTF workflow, each channel remains data and must not receive sRGB conversion.
Use IOR for dielectrics and transmission effects
IOR, or index of refraction, controls dielectric reflection behavior and is also used by transmission-related effects. The Principled BSDF manual lists IOR as a physical material parameter.
For opaque plastics, paint, ceramic, and rubber, a plausible IOR gives a stable dielectric reflection response. Do not change IOR to compensate for a roughness or lighting mismatch. If a glossy plastic looks flat, first inspect the environment, roughness, normals, and camera angle.
For glass or clear plastic, IOR becomes more visible because it affects refraction as well as reflection. Use a real reference or a measured material value when the project requires close matching. Thin packaging windows and thick glass bottles are different cases. Thickness changes the visible result, so the geometry and the transmission setup must agree.
Connect color textures and data textures correctly
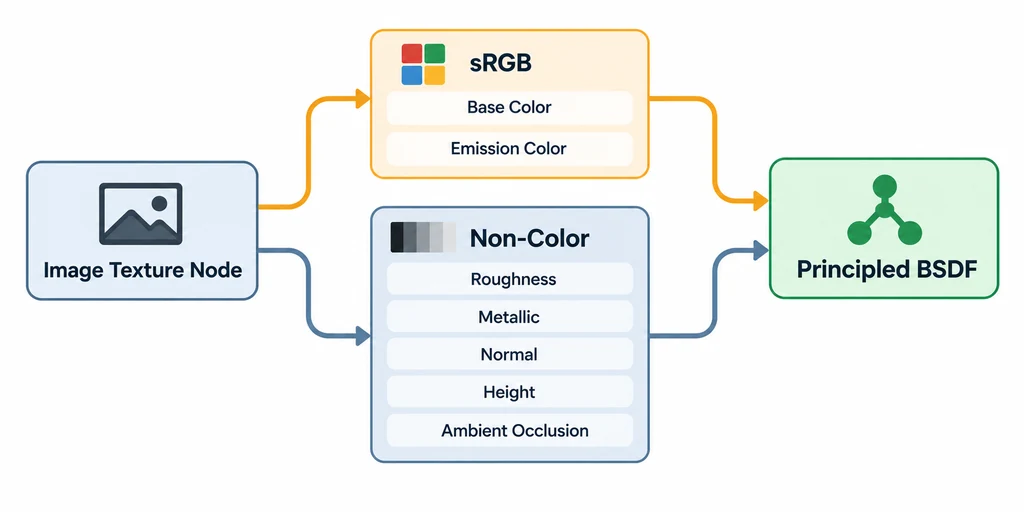
Use this practical rule:
sRGB: Base Color and Emission Color textures.
Non-Color: Roughness, Metallic, Normal, Height, Ambient Occlusion, masks, and packed ORM textures.
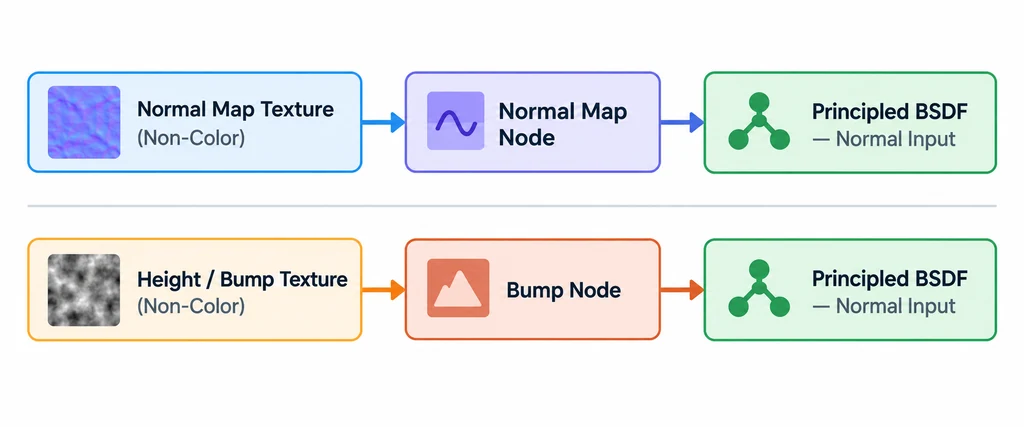
Normal maps: Send the Non-Color image through a Normal Map node before connecting it to the Principled BSDF Normal input.
The Normal Map node converts a normal-map texture into a normal input for the shader. It is not interchangeable with a grayscale bump image. Use a Bump node for height-style grayscale detail. Blender documents both nodes separately in its shader-node reference. Blender Manual: Normal Map Blender Manual: Bump
Check the material under useful lighting
Do not approve a product material under one dramatic environment. Test it under at least a neutral studio setup and an environment that reveals broad reflections. Rotate the object. Check grazing angles, edge highlights, and regions where the material transitions between parts.
For a web or AR asset, repeat the check in the target viewer. Blender's render can validate the authored appearance, but the delivered result also depends on the exported material model, supported extensions, environment lighting, and the renderer's color pipeline. Keep the authored material simple until the required target behavior is verified.